
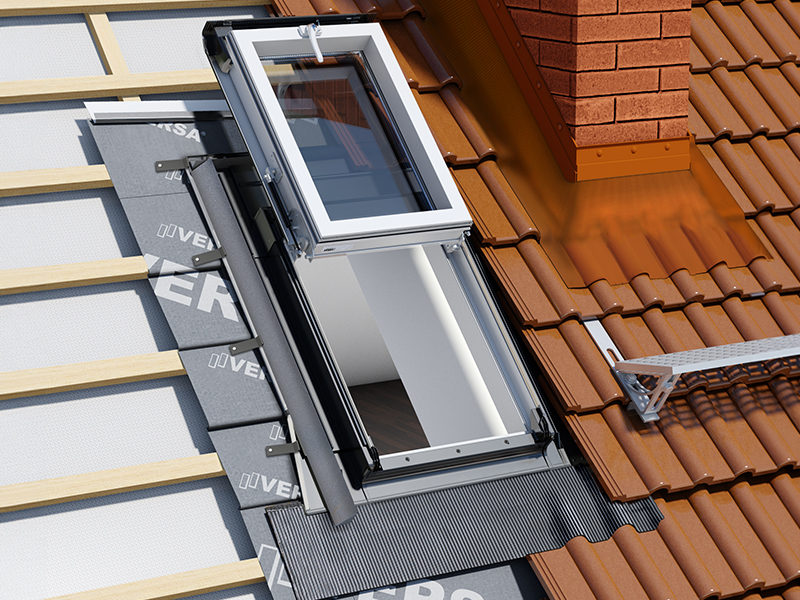
Jak prawidłowo zamontować okno dachowe? Poradnik krok po kroku
Montaż okien dachowych to inwestycja, która znacząco wpływa na komfort użytkowania poddasza. Prawidłowa instalacja zapewnia nie tylko optymalne doświetlenie pomieszczenia, ale również szczelność oraz wysoką izolacyjność termiczną i akustyczną. W tym przewodniku przedstawiamy wszystkie kroki niezbędne do profesjonalnego i bezpiecznego montażu okna dachowego.
Przygotowanie do montażu
Narzędzia i materiały
Przed rozpoczęciem prac upewnij się, że posiadasz kompletny zestaw narzędzi i materiałów:
Narzędzia: piła ręczna lub elektryczna, śrubokręt krzyżakowy i płaski, poziomnica budowlana (min. 80 cm), miarka zwijana (5 m), ołówek stolarski.
Materiały montażowe: taśma paroprzepuszczalna, pianka montażowa niskoprężna, kątowniki montażowe (jeśli nie są dołączone do okna), wkręty montażowe.
⚠️ Bezpieczeństwo przede wszystkim!
Praca na dachu wiąże się z ryzykiem upadku. Pamiętaj o:
Stabilnym rusztowaniu lub odpowiednio zabezpieczonej drabinie,
Asekuracji i szelkach bezpieczeństwa,
Zabezpieczeniu miejsca pracy przed opadami atmosferycznymi,
Odpowiednim oświetleniu stanowiska,
Pomocy drugiej osoby – montaż okna wymaga pracy w zespole.
Montaż krok po kroku
Krok 1: Przygotowanie otworu w dachu
Wymierzenie: Zaznacz obrys okna na konstrukcji dachu zgodnie z instrukcją producenta.
Luz montażowy: Sprawdź wymiary i dodaj 2–3 cm luzu montażowego z każdej strony.
Demontaż pokrycia: Usuń dachówki lub inne pokrycie w miejscu planowanego otworu.
Przygotowanie izolacji: Wytnij folię paroprzepuszczalną oraz wełnę mineralną.
Docięcie łat: Przetnij łaty dachowe, zachowując odległości wskazane w instrukcji.
💡 Wskazówka: Zawsze rozpoczynaj cięcie od wewnątrz pomieszczenia – ułatwia to kontrolę obrysu.
Krok 2: Montaż kątowników
Kątowniki montażowe ułatwiają prawidłowe ustawienie okna, zapewniają stabilność konstrukcji oraz pozwalają na szybką regulację.
Zamontuj kątowniki w przygotowanych wcześniej wrębach w ramie okna.
Upewnij się, że są zamocowane idealnie prostopadle do ramy.
Dokręć śruby mocujące – nie dokręcaj ich na sztywno, zostaw niewielki luz na późniejszą regulację.
Krok 3: Osadzenie okna w otworze
Wstawienie ramy: Wstaw okno do otworu od zewnątrz (wymaga udziału dwóch osób).
Stabilizacja: Zastosuj kliny dystansowe w dolnej części ramy dla wstępnej stabilizacji.
Kontrola pionu i poziomu: Sprawdź ustawienie poziomnicą w dwóch płaszczyznach (pionowej i poziomej).
Regulacja: Wyreguluj położenie ramy za pomocą kątowników montażowych.
Mocowanie: Przymocuj tymczasowo kątowniki do krokwi.
⚠️ UWAGA: Okno musi być ustawione idealnie w pionie i poziomie – jest to warunek konieczny do prawidłowego działania skrzydła i zachowania szczelności.
Krok 4: Montaż kołnierza uszczelniającego
Kołnierz (fartuch) zapewnia szczelne połączenie ramy okiennej z pokryciem dachowym.
Rozpakuj kołnierz i upewnij się, że jest przeznaczony do Twojego typu pokrycia dachowego.
Zamontuj dolną część kołnierza (pod dachówkami).
Zamontuj elementy boczne (pod dachówkami po bokach).
Zamontuj górną część (na dachówkach).
Upewnij się, że zachowano odpowiedni zakład elementów (minimum 10 cm).
❌ Najczęstszy błąd: Odwrotna kolejność montażu elementów kołnierza powoduje, że spływająca woda wnika POD kołnierz zamiast spływać NA niego.
Krok 5: Uszczelnienie połączeń
Uszczelnienie wewnętrzne
Zamontuj taśmę paroprzepuszczalną wokół ramy okna.
Wypełnij szczeliny niskoprężną pianką montażową.
Po całkowitym stwardnieniu pianki obetnij jej nadmiar nożem.
Zamontuj wewnętrzne taśmy wykończeniowe lub ramki ozdobne.
Uszczelnienie zewnętrzne
Skontroluj poprawność ułożenia kołnierza uszczelniającego.
W razie potrzeby zastosuj dodatkową uszczelkę silikonową w miejscach narażonych na przecieki.
Dopatrz i ułóż dachówki wokół ramy okna.
Krok 6: Montaż okapnika i akcesoriów
Okapnik kondensatu: Zamontuj okapnik nad górną krawędzią okna – odprowadza on skropliny poza obszar ramy.
Akcesoria dodatkowe (opcjonalnie):
Rolety zewnętrzne lub żaluzje,
Moskitiera,
Kołnierz podwyższający (dla pokryć o wysokim profilu).
Krok 7: Sprawdzenie działania
Po zakończeniu prac montażowych przeprowadź weryfikację:
✅ Otwieranie i zamykanie: Skrzydło obraca się płynnie, bez oporów i zacięć.
✅ Szczelność: Brak przecieków podczas próby deszczowej (np. polewanie strumieniem wody z węża).
✅ Wentylacja: Nawiewnik okienny działa prawidłowo.
✅ Blokady: Zamek i mechanizmy zabezpieczające funkcjonują poprawnie.
✅ Estetyka: Brak uszkodzeń ramy i pokrycia, wszystkie elementy są zamontowane równo.
Najczęstsze błędy podczas montażu
❌ Błąd 1: Za mały otwór
Skutek: Okno jest wciśnięte „na siłę”, nie domyka się, istnieje ryzyko pęknięcia szyby.
Rozwiązanie: Zawsze pozostawiaj 2–3 cm luzu montażowego z każdej strony.
❌ Błąd 2: Nieprawidłowy poziom
Skutek: Skrzydło samo się otwiera lub zamyka, woda opadowa spływa do wnętrza.
Rozwiązanie: Używaj długiej poziomicy (min. 80 cm) i sprawdzaj ustawienie w 2 płaszczyznach.
❌ Błąd 3: Zła kolejność montażu kołnierza
Skutek: Woda podsiąka pod kołnierz, co prowadzi do zalania poddasza.
Rozwiązanie: Montuj elementy zawsze od dołu do góry (dolna część pod dachówką, górna na dachówce).
❌ Błąd 4: Brak izolacji przeciwwilgociowej
Skutek: Gnicie więźby dachowej oraz powstawanie grzybów i pleśni.
Rozwiązanie: Bezwzględnie stosuj taśmę paroprzepuszczalną i piankę niskoprężną.
Kiedy warto zaufać fachowcowi?
Mimo że montaż okna dachowego jest możliwy do wykonania we własnym zakresie przez osobę z podstawowymi umiejętnościami budowlanymi, w niektórych sytuacjach zaleca się skorzystanie z pomocy profesjonalnego dekarza:
⚠️ Strome dachy (o nachyleniu powyżej 60°),
⚠️ Trudny dostęp do połaci (wysokie budynki, brak możliwości rozstawienia rusztowania),
⚠️ Brak doświadczenia w pracach dekarskich i obróbce blacharskiej,
⚠️ Montaż okien wielkogabarytowych lub o niestandardowych kształtach,
⚠️ Wymogi gwarancyjne (niektórzy producenci uzależniają pełną gwarancję od montażu przez certyfikowaną ekipę).
Prawidłowy montaż okna dachowego to gwarancja komfortu, ciepła i bezpieczeństwa na poddaszu przez wiele lat. Pamiętaj o kluczowych zasadach:
Bezpieczeństwo – zawsze zabezpieczaj miejsce pracy i stosuj środki ochrony.
Precyzja – mierz dokładnie przed wykonaniem każdego cięcia.
Wypoziomowanie – rama musi być ustawiona idealnie prosto.
Szczelność – dokładne wykonanie izolacji i montaż kołnierza chronią przed wilgocią.
Cierpliwość – wykonuj prace starannie i bez pośpiechu.
Potrzebujesz pomocy?
Jeśli masz pytania lub potrzebujesz wsparcia technicznego, skontaktuj się z naszymi doradcami:
📞 Telefon: +48 539 971 458
📧 E-mail: serwis@okpol.com